
So, here I have this new room that I am going to build a model railroad in. I don’t have a plan drawn yet, as I am in the process of doing research. I also have a bunch of equipment of various vintage sitting in a box that will eventually need to be tested to see if they are worthy of being on the future railroad. So what to do in the meantime until I can start building the full size model railroad? Build a test module of course!
The module’s inspiration came from a couple of spare pieces of plywood floating around in my garage. The where about a foot and a half deep to about four feet long. I was working on another project, and I thought to myself, that would be cool to build a little module on so I can test my equipment, while getting my feet wet at model railroading the same time. It was time to plan it out.
During the planning process I set some goals for the new module. They where:
- To build an ‘obstacle course’ for my equipment. I need a place where I can test run engines and cars.
- To practice my modeling skills. I have never really done this before, so I wanted a project to test various techniques.
- As a bonus, a place to program decoders. I plan on eventually using DCC with my engines. I wanted a place where I can program and test the results off layout.
The basic construction of the module is straight forward. To do this, I used the following materials and tools:
- A piece of plywood that is not very wide. One place to look is in the ‘junk’ wood section of your local lumber yard. They may have pieces left over from ripping larger pieces for other people.
- One 2x4x8, if your piece of plywood is under 4 feet long. You may need a second if your plywood is longer than that.
- Enough extruded foam insulation to cover your plywood. In my case, I used 2 two feet x two feet (2’x2′) pieces.
- A bunch of #10 wood screws. I ended up using 12.
- Wood glue.
- Liquid Nails for projects to laminate the foam to the plywood. (Make sure its foam safe)
- A drill, with the appropriate size drill bits, plus a Philips bit will allow you to use the drill to drive the screws in.
- A saw to cut the 2×4(s) down to size, and to reshape your piece of plywood if needed.
- Jigsaw with a fine toothed metal-cutting blade.
Some forms of plywood have a rough and smooth side to them. If this the case for the plywood that you are using, then make sure that the rough side is up. This will help with laminating the foam to the foam a little more ‘teath’ to adhear too.
First I wanted to attach the 2×4 to the plywood. I measured the length of the plywood, and then cut the 2×4 to size, giving me 2 2x4s about four feet long. I clamped one of the 2x4s to the long side of the plywood, and drilled 6 pilot holes through the plywood and into the 2×4. Make sure that the bit you are using for the pilot holes is smaller than the inner diameter of the wood screw you are using. I then unclamped the 2×4 from the plywood. I drilled larger holes into the plywood using a bit that is slightly bigger than the overall diameter of the screws, while using the pilot holes as a guide. You will need to keep track of which 2×4 went to which side of the plywood so the holes will match up when you are ready to attach the 2×4 to the plywood.
I ran a bead of wood glue along the top of one of the 2x4s. I first put two screws into the holes on each end of one side of the plywood, and using those screws as a guide to re-align the holes, I then clamped the 2×4 again to the piece of plywood. After fine tuning the position of the 2×4, I screwed in the guide screws, and then all the remaining screws. Repleat this process for the other side.
Now it’s time to turn to laminating the foam to the plywood. I purchased 2 2×2 foot pieces as it was more economical to do so because there would be less waste. I put the two pieces of foam on the plywood with the seam approximately in the middle length wise. I alighted the front edges of the foam with the front edge of the plywood. I then clamped it all in place once I was happy with the positioning. I used a sharpie marker to mark the outline of the plywood on the foam. I then removed the foam and clamps from the plywood.
To cut the foam down to size, I used a jigsaw with a fine toothed metal-cutting blade. The reason I used the fine toothed blade is so that there would be a smoother cut with less dust. I ran the jigsaw along the lines that I marked earlier. Make sure that you have some sort of eye protection when using the jigsaw.
Use Liquid Nails for Projects to attach the foam to the plywood, . Make sure you get the type that is foam safe, or else it will attack the foam and ruin your day. I did one piece of foam at a time by running a bead of Liquid Nails over half the plywood, along the edges, and finally zigzagging all through the middle. The idea is to get good coverage, but not so much that it oozes out of the seams when the foam is pressed into place. Press the foam piece onto the plywood. Position it where you want it, then place some weights onto to ensure good adhesion. Glue down the second peice, and position tit so there very tight seam between the two halves and is aligned with the first peice. Let it dry for about 24 hours to make sure the adhisive is fully cured.
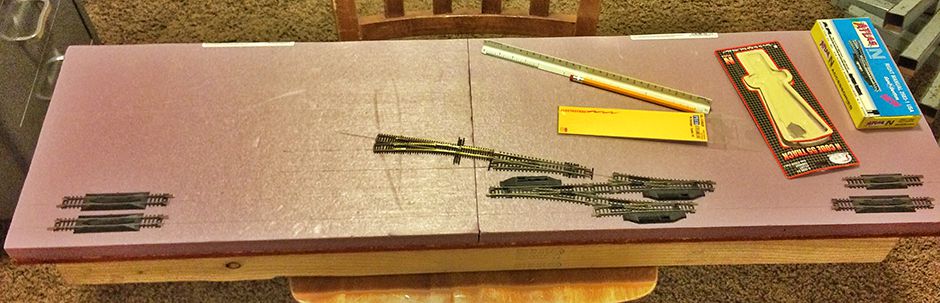
You should now have a peice of plywood with foam on the top, and two 2x4s attached to the bottom. This will be the base for the test module.

In the next installment, I’ll go over my reasoning for the track plan, and how I layed out the track plan onto the foam.